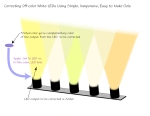
 Remember our color temperature drifting in our LED wall washing application note? No? Click here to read all about it Well, as you may recall we had 6 high power LEDs on a linear board to be installed either in a ceiling or in a floor along a wall. The LEDs were fitted with large 3/4-inch diameter can-type prismatic, directional diffusers. The problem was that the LED manufacturer’s binning for accounts buying less than a zillion LEDs leaves something to be desired. Add to that the fact that the contract manufacturer didn’t assemble these first using LEDs from one lot and then progressing to the next but rather a mix and match approach as they went along. We were expecting the LEDs to be warm white but what we got was anything from deep amber to pink with several shades of yellow, orange, and green in between. There were hundreds of these boards made and even with the solution of pulling the surface mount LEDs off the board and binning them by color on our end, we were faced with the prospect of 30 – 40% board loss. Ouch!
 ![]()
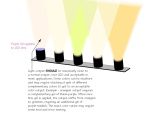
Well, using all of my artistic color theory I learned in college another engineer and I came up with a novel solution that is not only simple enough to be manufactured in-house but dirt cheap as well! I am hugely familiar with optical filter design in addition to light, light properties, and light measurement and knew that the way to cancel out a particular color was to use it’s complementary color in a gel filter (optical filter made of plastic, glass, or even gelatin which is where the name comes from – think Kodak Wratten filters) of some transparency level other then totally opaque. The other engineer assigned to the project came to the same conclusion at the same time separately from me – clever guy! Now we could have gone out and bought expensive, ready-made optical gels but during the testing stage we would need to go through multiple shades of a particular complementary color to find just the right shade of complementary color to correct an LED. Not to mention that we would need several different complementary gel colors to correct for the various shades of LED colors PLUS the fact that we would probably need several levels of opacity since we had several strengths of each color from the LEDs output (i.e. amber, dark amber, and really dark amber).All this trial and error testing would leave us needing a huge library of color gels which would be a gigantic expense. We both knew that the best way to do this would be to manufacture the gels in-house. I had done something similiar on a different project where I needed colored lenses to cover LEDs on an in-house manufactured vinyl instrument panel label – I had used ink-jet transparency film to print the LED lenses. BINGO! We could print various shades of the complementary colors we needed at various opacity levels on transparency film in my desktop ink-jet printer! We could print strips of 1 or 2 inch squares with each succesive color a darker or lighter shade of the color we thought was complementary to the LED colro we  needed to correct. We could print all of these at whatever opacity we needed. In this way, we could hold the strip over the LED and cycle it through the squares on a strip and see it’s effect on the LED light ouput color in realtime. Testing with a light meter revealed that the gels reduced the light output by well less than 10%, which in this case was not a problem since the LEDs were to be operated at a power rating slightly ABOVE the design spec. The other engineer and I were able to come up with the 6 or so colors we needed and at what opacity levels we would need all for the cost of one box of ink jet transparency film ($15.00) and our time. As it turned out, this was a HUGE time saver as well. Taking the SMT LEDs off to correct the problem the board would require about 1 hour per board plus the time of resoldering a new LED on to a new board (the metal-core board would be destroyed taking the LEDs off). Anyrate, we settled on 5%, 10%, 15%, 20, and 25% opacity so we had 6 colors at 5 opacity levels for a total of 30 different types of gels. Once the testing was done and we had our selections, we set about manufacturing the actual gels to fit the LEDs. Here I took each color/opacity level and printed it out on an entire sheet of ink-jet transparency film (along with some text indicating what color and opacity level it was so we wouldn’t have any binning mistakes later). Once all 30 combinations had been printed in this manner, our production department set about punching out 3/4-inch circles using a hollow punch and a hammer. We got over 150 circles per page. We used plastic cups labeled with the color and opacity level and these were filled as the puncher went along. The entire punching process took about 4 hours – less than the time it would take to yank the LEDs off of 5 boards! Once all the punching and binning was done, then we went about correcting each LED on a board. The 3/4-inch round gels were designed to fit right in to the recess at the top of the LED’s can diffuser/lens. The fit was perfect! We would still need to do a little trial and error testing by occasionally swapping circle gels onto and off of an LED until it was corrected to the best of our ability. Once a gel was found that worked well, it could be glued into place with a few dabs of quick drying optical epoxy on the edges. Once a few had been done, the process got really easy and quick. We did find a few oddball LEDs with weird in-between colors in their output that required either printing and punching a new gel set or in a few cases, stacking gels to achieve the best possible correction level. For example we had an LED with orangish output that when we applied the bluish-purple complementary gel, shifted to a slightly green output which required the application of another gel of purplish-red to correct. There were a few LEDs that had colors that kept shifting around no matter what we did – these were chocked up to loss.
It wasn’t elegant but it was cheap and effective and will ultimately reduce the board loss to the barest minimum - our test batch sent to the customer had LED with output colors well within their design specs so we are confident the solution will pass muster. I’ll let you know
as soon as I hear back. ![]()


View the original article here
Visit LightingShowroom.com for all your home lighting needs.
No comments:
Post a Comment